Atop a very smelly Tauntaun, and having endured the fierce cold of the Hoth icescape around him whilst planting vital sensors for the Rebel Alliance, a weary Han Solo returns back to Echo Base in this great storyboard for The Empire Strikes Back from 1979.
The ice planet Hoth is not only dangerous for its inhospitable weather conditions, but also for the deadly creatures that reside there. For example, the monstrous Wampa species, who prey on and attack from their snow camouflage anything they think they can eat. Unfortunately, one such wild beast becomes easy prey to another type of creature, an Imperial Probe Droid, which finds its icy lair and soon destroys it before moving on in its search for any signs of human Rebel activity.
A storyboard to a deleted scene from The Empire Strikes Back that was partially filmed on location in Norway with the Probot prop back in March 1979 (the Wampa likely changed to a rodent). The scene can also be found in the original Donald Glut novelisation of the film, released in 1980.
It's an old trick that gets the better of his Imperial foes, as Han Solo pilots the Millennium Falcon out of its successful cover within the Star Destroyer junk field, but his nemesis in bounty hunter Boba Fett (aboard Slave 1) knows the escape technique too, soon trailing the non functioning hyperdrive freighter to its new destination of Bespin...
Shot on 23rd August 1979, Jeremy Bulloch filmed his last scene as Boba Fett against blue screen, at Elstree Studios, captured by a second unit, with 19 days having been spent playing the character overall for The Empire Strikes Back, who, on theatrical release a year later, would make a huge impact with fans worldwide...
Original storyboard for the scene, by Joe Johnston.
The chase is on for Luke and Leia as they commandeer a speeder bike to pursue and stop Imperial Scout Troops from giving away the Rebels secret arrival on Endor, during one of the many highlight action sequences beloved by fans worldwide from Return of the Jedi.
Check out this great from-animatics-to-shooting comparison of the exciting sequence from filmmaker Luke Asa Guidici.
The first conceptual art version of the immense Super Star Destroyer Executor, centre amidst a convoy of other ancillary Imperial ships, is well captured in ominous storyboard art by Joe Johnston for The Empire Strikes Back.
Arriving too late at Cloud City's East Platform, Leia and Lando can only look on as Boba Fett makes his escape on Slave 1, with his 'special cargo' aboard in the carbonized Han Solo. A great storyboard for The Empire Strikes Back whose scene location would be altered visually by the time of Summer 1979 filming at Elstree Studios...
The shot has similarities to this exciting production painting done by Ralph McQuarrie for the scene, which shows Chewbacca and Leia breaking glass to shoot at the departing vessel.
Ralph McQuarrie's final painting from September 25th, 1978.
The legendary scene once witnessed only briefly in its raw form within the classic From Star Wars to Jedi: The Making of a Saga documentary of 1983, now enhanced with CGI, as Han Solo and Jabba the Hutt spar at Mos Eisley spaceport's Docking Bay 94, within the seemingly constantly revised Star Wars Trilogy Special Editions, all of which were truly enjoyed by fans upon original release during Jan-March, 1997 (but sadly became controversial over time), kickstarting the saga anew on the big screen whilst also generating a helluva lot of money, much of its tie-in profits ultimately going towards the production costs of the then eagerly awaited, upcoming Prequels, to debut in 1999.
Abandoning his X-wing fighter's computer-controlled targeting computer and acting purely on his instincts and the power of the Force within him, Luke successfully launches his proton torpedos into the Death Star thermal exhaust under port, setting off a chain reaction stellar explosion of the dreaded space station. Its destruction proves a savage blow for the Empire, of which galactic freedom has been won by the Rebel Alliance. Luke and his surviving fighter pilot colleagues, plus the to-the-rescue Millennium Falcon, head back to Yavin IV to celebrate their incredible victory...
BEHIND THE SCENES
Joe Johnston storyboard of the classic moment.
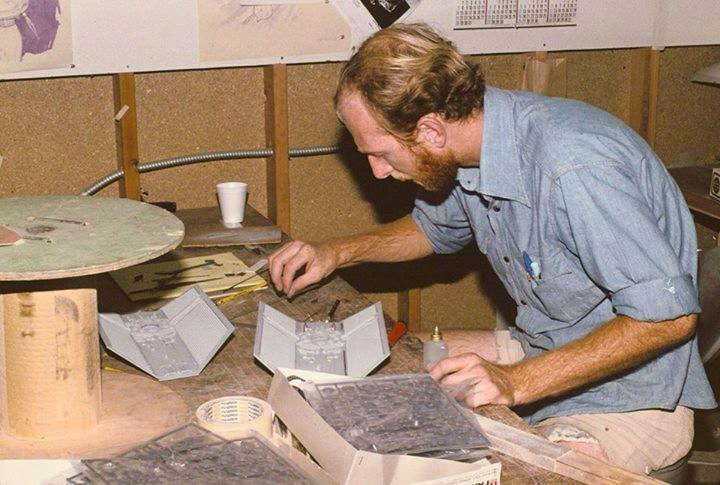
Steve Gawley at work on the Thermal Exhaust Port surface model.
The highly detailed model with previous unsuccessful rebel torpedo impact adjacent to the entry port.
An ILM hand at work!
Paul Huston and Joe Johnston add details work to the model.
On screen, Luke's skill in the Force pays off as the Death Star is destroyed!
A spectacular explosion filmed by ILM at high speed and slowed down in post production for more on-screen impact.
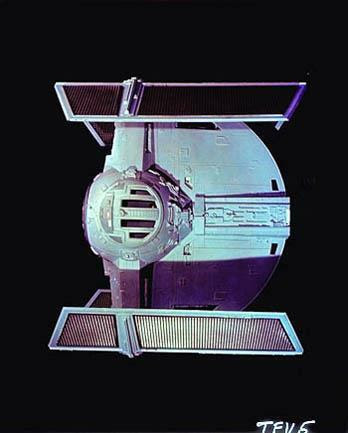
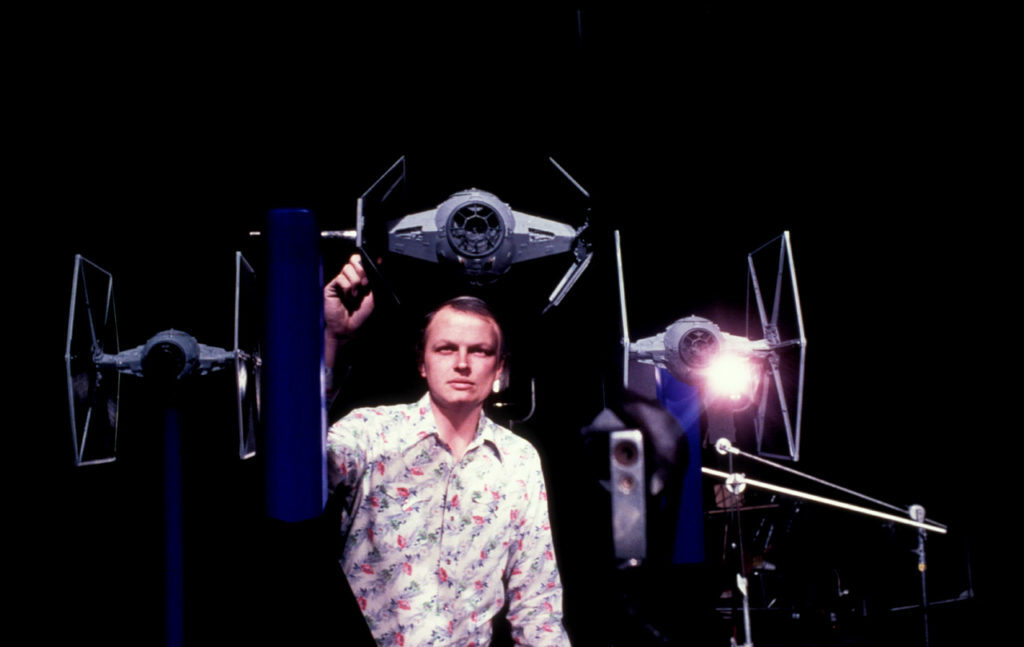
In his advanced prototype TIE fighter and with loyal wingmen nearly an equal to his considerable piloting skills, the Lord Darth Vader has successfully destroyed two prior bombing flights of Rebel fighters that had penetrated a potential weak spot in the Death Star's defences. But with this final flight trio of X-wing fighters to whom he's now pursuant, Vader senses something unusual about the lead Rebel pilot and his latent skills in the Force. The Dark Lord's near successful attempts to shoot down Luke Skywalker soon come to no avail, however, thanks to the last minute arrival of a certain Corellian smuggling vessel...
Originally, it was planned that Darth Vader would be housed within a standard TIE fighter during the fast paced trench run chase/battles, but Lucas decides in post production that his craft should ultimately stand out to viewing audiences in the sequence alongside his wingmen, with money being made in the ILM model budget to see-in the necessary change requirements. A shot would be added to Post Production (the last change made to the film) by Lucas clarifying that Vader would survive the battle, his ship hurling out into space before he stabilises it and flies off.
Various storyboards.
Revised storyboard to incorporate Vader's new TIE design.
Side angle design by Joe Johnston.
Middle section final construction.
Gorgeous final detailing.
Two storyboard art pieces by Joe Johnston.
One of Vader's wingmen is suddenly taken out by the arriving Han Solo.
Early prototype for revised Vader TIE design.
Steve Gawley working on the model in varying stages.
In the model shop...
Ready for filming.
Various angles of the finished model.
Joe Johnston checks one of the model's fin's prior to filming.
Lorne Peterson and Grant McCune during filming on the ILM blue screen stage.
Classic BTS image of Dennis Muren with the models.
Filming the trio's departure from the Death Star hangar.
More filming images.
David Jones making some attachment checks to the model.
The saga of an unlikely pairing in a dark and dangerous universe continues in the standalone movie that is The Mandalorian and Grogu . Imag...
AVAILABLE IN AN ALL- NEW EDITION FROM DECEMBER, 2022...
'THE STAR WARS ARCHIVES - EPISODES I - III 1999 - 2005'
OUT NOW IN A NEW 2020 EDITION
'STAR WARS ARCHIVES - EPISODES IV - VI'
NOW STREAMING IN THE UK
'STAR WARS' ON DISNEY+
NOW AVAILABLE...
'THE STAR WARS ARCHIVES - EPISODES I - III'
AVAILABLE ON UK HOME ENTERTAINMENT FROM APRIL 20TH, 2020
EPISODE IX: THE RISE OF SKYWALKER
EPISODE IX: THE RISE OF SKYWALKER
TRAILER 4
EPISODE IX: THE RISE OF SKYWALKER
TRAILER 3
EPISODE IX: THE RISE OF SKYWALKER
INTERNATIONAL TRAILER 1
EPISODE IX: THE RISE OF SKYWALKER
FINAL TRAILER
EPISODE IX: THE RISE OF SKYWALKER
TEASER TRAILER 2
EPISODE IX: THE RISE OF SKYWALKER
TEASER TRAILER
EPISODE IX: THE RISE OF SKYWALKER
COMING DECEMBER 20TH, 2019
'STAR WARS - THE RISE OF SKYWALKER' - ORIGINAL MOTION PICTURE SOUNDTRACL
AVAILABLE IN THE UK FROM DECEMBER 20TH, 2019
'SOLO - A STAR WARS STORY' COMES TO UK BLU-RAY AND DVD
AVAILABLE FROM SEPTEMBER 24TH, 2018
'SOLO: A STAR WARS STORY - EXPANDED EDITION' NOVELISATION
AVAILABLE FROM SEPTEMBER 4TH, 2018
'SOLO' - OFFICIAL TRAILER
'SOLO' - OFFICIAL TEASER
'SOLO' - 'BIG GAME' TV SPOT
EMERGING FROM HYPERSPACE, 25th MAY, 2018
OUT NOW: 'SOLO: A STAR WARS STORY' - THE ORIGINAL SOUNDTRACK
MUSIC COMPOSED AND ADAPTED BY JOHN POWELL
'STAR WARS' AND 'STAR WARS AFICIONADO'
'MADE GREAT IN BRITAIN'!
IN MEMORIAM...
REMEMBERING AND CELEBRATING CARRIE FISHER
COMING MARCH 3RD, 2020
'THE RISE OF SKYWALKER' - EXPANDED EDITION
AVAILABLE 9/4/18 - ON UK BLU-RAY, 4K UHD, AND DVD
'STAR WARS - EPISODE VIII: THE LAST JEDI'
'THE LAST JEDI' - INTERNATIONAL TRAILER 3
'THE LAST JEDI' - INTERNATIONAL TRAILER 2
'THE LAST JEDI' - INTERNATIONAL TRAILER
'THE LAST JEDI' - BEHIND THE SCENES TASTER 2
'THE LAST JEDI' - OFFICIAL TRAILER 2
'THE LAST JEDI' - BEHIND THE SCENES TASTER
'THE LAST JEDI' - TEASER TRAILER
OUT NOW ON CD AND ONLINE
'THE LAST JEDI' - THE ORIGINAL MOTION PICTURE SOUNDTRACK
NOW AVAILABLE ON BLU-RAY...
'STAR WARS: THE FORCE AWAKENS' COLLECTOR'S EDITION (BLU-RAY 3D)
A REBELLION BUILT ON HOPE...
'ROGUE ONE' - COMING TO UK DVD, BLU-RAY AND DIGITAL DOWNLOAD FROM APRIL 10TH, 2017
'ROGUE ONE' - INTERNATIONAL TRAILER 4 (DECEMBER 2016)
'ROGUE ONE' - US THANKSGIVING TRAILER
'ROGUE ONE' - SOUTH KOREA TRAILER (NOVEMBER 2016)
'ROGUE ONE' - INTERNATIONAL TRAILER TWO (NOVEMBER 2016)
'ROGUE ONE' - TRAILER TWO (OCTOBER 2016)
'ROGUE ONE' - INTERNATIONAL TRAILER (AUGUST 2016)
'ROGUE ONE' - TRAILER ONE (AUGUST 2016)
'ROGUE ONE' - TEASER TRAILER (APRIL 2016)
COMING DECEMBER 16TH, 2016...
MAY THE FORCE BE WITH YOU!
WELCOME TO THE UNIVERSE OF STAR WARS AFICIONADO
WELCOME TO THE WORLD OF STAR WARS AFICIONADO!
Written and conceived by Scott Weller, this is the website to the popular UK STAR WARS fan magazine STAR WARS AFICIONADO. The aim of this blog is to educate, enlighten and, hopefully, entertain STAR WARS fans of all ages across the world. Basically, to have fun and enjoy all six of George Lucas's classic movies, the three sequel adventures linked to the Skywalker family (2015 to 2019) and the two spin-off anthology films ROGUE ONE and SOLO. Plus animated TV series spin-off THE CLONE WARS (and STAR WARS REBELS). AFICIONADO celebrates the actual films NOT the modern merchandise overkill!
From time to time, this site will also cover other classic LUCASFILM related movies and TV series, like the INDIANA JONES saga (I to IV), WILLOW, THX-1138, AMERICAN GRAFFITI and RED TAILS.
The original fourteen issue run ofSTAR WARS AFICIONADO wasnon-profit making. The site, and former magazine, are NOT affiliated with/to LUCASFILM in any way. All images that appear on this site, unless previously specified, belong to LUCASFILM and its affiliates.Unless stated and credited to an outside source, all opinions expressed on this blog belong to the Editor and do not necessarily reflect the views of STAR WARS fandom in general.
Thank you, George Lucas, for creating such a wonderful, inspiring and evergreen universe!
RETURNING TO BLU-RAY FROM OCTOBER 2015
'STAR WARS: THE COMPLETE SAGA'
STAR WARS: THE DIGITAL MOVIE COLLECTION
NOW AVAILABLE ON DIGITAL HD, WITH NEW BONUS FEATURES
'STAR WARS' - TOPPS AUTHENTICS
OFFICIAL SITE FOR PHOTOS AND AUTOGRAPH PURCHASES
EXPLORE THE 'STAR WARS' UNIVERSE IN BOOKS FOR ALL AGES...
FROM EGMONT UK
ROLLING IN TO BAKER STREET FROM EASTER 2016
BB-8 COMES TO MADAME TUSSAUDS 'STAR WARS EXPERIENCE'
'STAR WARS AFICIONADO' RECOMMENDS...
'STAR WARS - OBJECTS DU MYTHE' CLASSIC TRILOGY ARCHIVE BOOK
STAR WARS ART: RALPH McQUARRIE
AVAILABLE IN HARDCOVER FROM 27TH SEPTEMBER, 2016
'THE FORCE AWAKENS' - OFFICIALLY LICENSED APPAREL, from DESIGNBYHUMANS
CLICK THE IMAGE TO BROWSE AND ORDER
BEHIND THE SCENES OF 'STAR WARS' (1977)
THE CONTINUITY POLAROIDS OF ANN SKINNER
DISCOVER "THE OTHER' EPISODE VI
STAR WARS AFICIONADO ARCHIVES: 'REVENGE OF THE JEDI' SITE
COMING TO THE UK FROM MAY, 2015
'STAR WARS' AT MADAME TUSSAUDS
STAR WARS: THE CLONE WARS (2008 - 2013)
THE AFICIONADO EPISODE GUIDE AND REVIEWS AREA
AVAILABLE OCTOBER 14th 2013 ON BLU-RAY AND DVD
'THE CLONE WARS' THE COMPLETE SEASONS 1-5 BOX SET
STAR WARS: EPISODE I - THE PHANTOM MENACE
RARE PHOTOS GALLERY
STAR WARS: EPISODE II - ATTACK OF THE CLONES
RARE PHOTOS GALLERY
STAR WARS: EPISODE III - REVENGE OF THE SITH
RARE PHOTOS GALLERY
STAR WARS: EPISODE IV - A NEW HOPE
RARE PHOTOS GALLERY
STAR WARS: EPISODE V - THE EMPIRE STRIKES BACK
RARE PHOTOS GALLERY
STAR WARS: EPISODE VI - RETURN OF THE JEDI
RARE PHOTOS GALLERY
STAR WARS: EPISODE VII - THE FORCE AWAKENS
RARE PHOTOS GALLERY
ROGUE ONE: A STAR WARS STORY
PHOTO GALLERY
THE STAR WARS SAGA - BEHIND THE SCENES
SIX FILM PHOTO GALLERY
STAR WARS: THE CLONE WARS - THEATRICAL MOVIE 2008
PHOTO GALLERY
STAR WARS: THE CLONE WARS - TV SERIES (2008 - 2013)
SEASON ONE PHOTO GALLERY
A NEW BEGINNING FOR THE 'STAR WARS' THEATRICAL EXPERIENCE
STARTING IN DECEMBER 2015...
STAR WARS AFICIONADO PDF BACK ISSUES NOW AVAILABLE
CLICK THE PICTURE TO FIND OUT MORE
STAR WARS - NOSTALGIA
FROM 1977 TO 2005
AFICIONADO ESSENTIAL PURCHASE
STAR WARS - COSTUMES: THE ORIGINAL TRILOGY
AFICIONADO ESSENTIAL PURCHASE
STAR WARS: STORYBOARDS - THE CLASSIC TRILOGY
AFICIONADO ESSENTIAL PURCHASE
J.W. RINZLER PRESENTS GEORGE LUCAS' 'THE STAR WARS' - AN 8-ISSUE SERIES FROM DARK HORSE COMICS
ESSENTIAL PURCHASE - OUT NOW
'ULTIMATE STAR WARS' - FROM DORLING KINDERSLEY
NOW AVAILABLE ON DIGITAL HD
'STAR WARS: THE FAMILY GUY TRILOGY'
'REMEMBERING RALPH McQUARRIE: DREAMER AND VISIONARY' BOOK








.jpg)